How to Set Up OpenClaw in 2026
The current OpenClaw setup path is: run the official installer for your operating system, complete the guided onboarding wizard, verify the local Gateway, and open the Control UI. QuickStart can take only a few minutes, while provider sign-in, channel pairing, daemon installation, and optional plugins can extend the process. Node 24 is recommended; Node 22.19+ and 23.11+ are also supported. Native Windows now has an official PowerShell installer, so WSL2 is optional rather than mandatory.
Here's what to expect when you get started. For detailed installation commands, see our complete installation guide. Already know what OpenClaw is? Jump to Step-by-Step Installation.

Use the verified setup path
This page is maintained as a written walkthrough. The commands below are checked against the official OpenClaw installation and onboarding documentation.
Open Official Getting Started DocsWhat You Need Before Installing OpenClaw
Before you install, make sure you have these prerequisites ready. Most developers already have everything — if not, setup takes an extra 5 minutes.
Computer (macOS, Linux, WSL2, or native Windows)
Use the shell installer on macOS/Linux/WSL2 or the official PowerShell installer on Windows.
Internet connection
For app integrations, API calls, and updates
A short focused setup window
QuickStart is usually a few minutes; provider sign-in, channels, and plugins can take longer.
A supported model authentication method
The onboarding wizard presents current provider and local-model options.
VPS for 24/7 operation (optional)
Hetzner, DigitalOcean, or any Linux VPS with 2GB+ RAM. $5-15/mo.
Node.js 22.19+, 23.11+, or 24+
Node 24 is recommended. The official installer can install or upgrade Node for you.
Download the latest LTS version from nodejs.org. We recommend Node.js 22 LTS. After installing, verify with node --version in your terminal. If you're on a Mac, you can also use brew install node.
What Does the Setup Process Look Like?
These are the core setup steps. Follow the sections that match your environment and integrations.
Step 1: Install via CLI
~5 minGet OpenClaw from the official site and install via the Node.js CLI. OpenClaw is free and MIT-licensed.
Step 2: Connect Your Apps
~5 minLink email, calendar, CRM, and other tools via OAuth.
Step 3: Configure Automation
~5 minDescribe what you want to automate in plain English.
Step 4: Test & Launch
~5 minVerify with test data, then activate your automation.
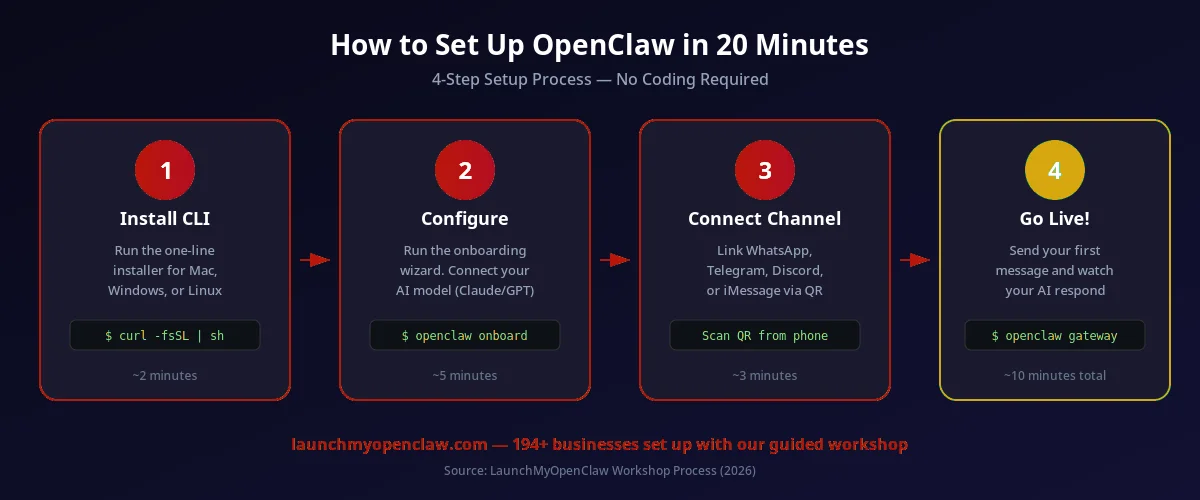
The complete OpenClaw setup flow — from installation to your first live automation
Step-by-Step Installation
These are the current official install commands. The installer checks your Node.js version and launches onboarding. For platform-specific detail, see our installation guide and the linked official docs.
macOS / Linux
# Official installer for macOS, Linux, and WSL2
curl -fsSL https://openclaw.ai/install.sh | bash

# Verify installation
openclaw --version
Windows PowerShell
# Official native Windows installer
iwr -useb https://openclaw.ai/install.ps1 | iex

# Verify
openclaw --version
Native PowerShell is now a supported install path. Use WSL2 when you specifically want a Linux-based Gateway workflow or need Linux tooling; it is no longer required for every Windows install.
Run Guided Onboarding
Let the wizard handle provider authentication, Gateway configuration, and the daemon. You can skip optional channels and return to them later.
# Run the official onboarding wizard
openclaw onboard --install-daemon

# Verify the local Gateway
openclaw gateway status

# Open the browser-based Control UI
openclaw dashboard
Configure OpenClaw Safely
Guided configuration is safer than copying an old JSON example. Use the wizard or the config CLI so OpenClaw validates current keys and provider choices before saving them.
# Re-open guided configuration
openclaw configure

# Show the active config file path
openclaw config file

# Validate the current configuration
openclaw config validate

# Inspect the current configuration schema
openclaw config schema
Model
Choose authentication and a model during onboarding. Available providers and model IDs change, so confirm them with the wizard or openclaw models list.
Channels
Enable the messaging platforms you want. WhatsApp and Telegram work out of the box. iMessage requires a Mac bridge.
Skills
Skills are what your agent can do — email management, calendar scheduling, CRM updates. See our skills guide for the full list.
Access Control
Control who can interact with your agent. Allowlist mode restricts access to specific phone numbers. See our security guide for best practices.
You don't need to configure everything at once. Start with one channel (WhatsApp is easiest) and one or two skills (email + calendar). You can always add more channels and skills later by updating your openclaw.json.
Should You Run OpenClaw Locally or on a VPS?
For testing and development, running locally is fine. But if you want your AI agent to respond to messages 24/7 — even when your laptop is closed — you'll need a VPS. Here's how the two options compare.
| Factor | Local Machine | VPS (Recommended) |
|---|---|---|
| Uptime | Only when computer is on | 24/7 always running |
| Cost | Free | $5-15/mo |
| Speed | Depends on hardware | Consistent low latency |
| Setup difficulty | Easier — just install | Slightly more steps (SSH) |
| Best for | Testing & development | Production & business use |
| Reliability | ||
| Multi-channel support |
Size the server for your agent's tools, browser workload, concurrency, and whether models run locally. Keep the Gateway on loopback by default and use the remote Gateway guide for SSH or private-network access from your devices.
Quick VPS Setup (Hetzner Example)
# SSH into your new VPS
ssh root@your-vps-ip

# Install OpenClaw (the installer checks prerequisites)
curl -fsSL https://openclaw.ai/install.sh | bash

# Configure OpenClaw and install its managed service
openclaw onboard --install-daemon

# Verify the Gateway
openclaw gateway status
Choosing the Right AI Model
OpenClaw works with multiple AI providers. Your choice affects cost, speed, and capability. Here's a guide to picking the right model for your use case.
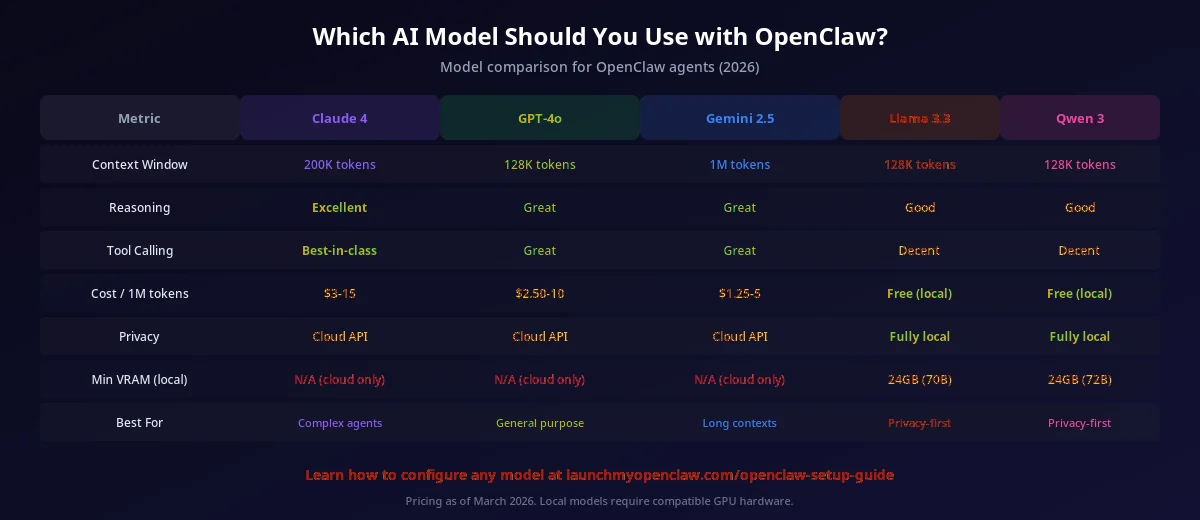
AI model comparison for OpenClaw business automation
Claude (Anthropic)
RecommendedBest for complex agent tasks: multi-step reasoning, tool use, and long conversations. Claude 4 Sonnet offers the best price-to-performance ratio.
- Complex reasoning
- Tool use (email, CRM)
- Long context windows
GPT (OpenAI)
Strong general-purpose model. GPT-4o is fast and affordable. Good choice if you already have an OpenAI API key or need vision capabilities.
- Fast responses
- Vision support
- Wide ecosystem
Local (Ollama)
Run Llama, Qwen, or Mistral locally for maximum privacy and zero API costs. Requires a machine with 8GB+ RAM. Ideal for data-sensitive businesses.
- 100% private
- Zero API cost
- Less capable
There is no permanent best default. Compare the providers currently shown by onboarding, start with one supported model, and measure quality, latency, and usage for your actual workflow. Change the default intentionally with openclaw models set <provider/model>.
Troubleshooting Common Issues
Running into problems? Here are the most common setup issues and how to fix them in seconds. For more help, the public OpenClaw documentation includes a full troubleshooting section with step-by-step setup guidance.
"openclaw: command not found"
This means the OpenClaw CLI isn't in your system PATH. The installer should add it automatically, but sometimes you need to restart your terminal.
# Find the global npm prefix
npm prefix -g

# Check whether its bin directory is on PATH
echo "$PATH"

# Then restart the shell or add the npm global bin directory
# to ~/.zshrc or ~/.bashrc as documented for your platform.
"Error: API key not configured"
Re-open guided configuration or the provider authentication flow instead of pasting a secret into an unverified command.
# Guided provider configuration
openclaw configure

# Or authenticate for a specific supported provider
openclaw models auth login --provider <provider-id> --set-default

# Validate configuration after the change
openclaw config validateNever share your API key publicly or commit it to git. OpenClaw stores it securely in your local config. If you suspect your key was exposed, rotate it immediately in your provider's dashboard.
"Connection timeout"
Check the managed Gateway first. QuickStart uses loopback and port 18789 by default; do not expose it publicly just to fix a local connection.
# Check the Gateway and configuration
openclaw gateway status
openclaw config validate
openclaw doctor

# Re-open the authenticated local Control UI
openclaw dashboard
"Model not available"
Your API key might not have access to the model you specified. Verify your plan includes the model, or switch to a different one.
# List models available to the current setup
openclaw models list

# Select a supported provider/model ID from that list
openclaw models set <provider/model>
"Permission denied"
File permission issue, common on Linux VPS setups. Fix with the correct ownership.
# Fix OpenClaw directory permissions
chmod -R 755 ~/.openclaw

# If installed globally, fix npm permissions
sudo chown -R $(whoami) ~/.npmThe official troubleshooting documentation covers current errors and recovery steps. You can also check our security guide before enabling remote access.
Which Setup Path Is Right for You?
Self-Serve Setup
Free
Follow the current written steps here and cross-check platform details in the official documentation.
- Public setup documentation
- Current install commands
- Onboarding and Gateway checks
- Troubleshooting references
Learn With Other AI Operators
Community
Explore the ClawRevOps community for people building AI agents, vibe-coded apps, and AI-powered offers.
- AI agent builders and business owners
- Vibe coding and practical implementation
- Selling and monetizing AI solutions
All Setup Guides
Mac Setup Guide
Install and configure OpenClaw on macOS
Windows Setup Guide
Native Windows and WSL2 setup options
Linux Setup Guide
Install OpenClaw on Ubuntu, Debian, and other distros
VPS Setup Guide
Deploy OpenClaw on a cloud VPS for 24/7 uptime
Mac Mini Setup Guide
Use a Mac Mini as a dedicated OpenClaw server
Docker Setup Guide
Run OpenClaw in a Docker container
Ollama Setup Guide
Run free local AI models with OpenClaw via Ollama
LM Studio Setup Guide
Connect OpenClaw to local models via LM Studio
Best Setup Options
Compare all setup paths to find the best fit
Kimi K2.5 Setup Guide
Configure OpenClaw with Moonshot's Kimi K2.5 model
DeepSeek Setup Guide
Use DeepSeek models with OpenClaw
GitHub Setup Guide
Clone and build OpenClaw from the GitHub repository
Gateway Setup Guide
Install, verify, secure, and remotely access the OpenClaw Gateway
Discord Setup Guide
Connect OpenClaw to Discord servers and channels
Browser Setup Guide
Enable browser automation and web scraping
Email Setup Guide
Connect email accounts for triage and auto-reply
Voice Setup Guide
Enable voice interaction and phone call automation
Jarvis Skills Setup
Install and configure the Jarvis skill pack
Slack Setup Guide
Integrate OpenClaw with Slack workspaces
Troubleshooting Guide
Fix common setup errors and connection issues
Best Models for OpenClaw
Which LLM models work best for different use cases
Bootstrap Guide
Quick-start OpenClaw with pre-built configurations
Raspberry Pi Setup
Run OpenClaw on a Raspberry Pi for low-cost automation
System Requirements
Hardware and software requirements for OpenClaw
Common Questions About Getting Started
Want to go beyond installation?
Explore the ClawRevOps community for AI agent building, vibe coding, and turning AI skills into practical offers.
Explore the Community